.jpg)

10 Top Tips For Neat Cross Stitching
- May 22
- 8 min read
There’s nothing more satisfying than finishing a cross stitch project and seeing every stitch sitting neatly in place, and with just a few small habits you can make a huge difference to how polished your finished work looks. It’s usually the simple things that help your stitches look smoother and more even, and once you pick up those habits, they quickly become second nature.
In this blog, I’m sharing 10 easy tips to help keep your cross stitching neat and those stitches looking oh so smart. These tips are perfect for beginners, but experienced stitchers might just pick up a tip or two to add to their own knowledge.
Before we start though, a reminder that cross stitching isn't a competition and the main goal is that you love the process. Please do not feel like your project has to be perfect to be worth doing. I often have people say to me at markets 'oh but mine wouldn't look like that'... IT DOESN'T MATTER! It's more important to enjoy the process and be super proud of each and every project you do. We WILL continue the fight against our inner perfectionist! So whatever you create...
1. tension
This first tip comes in three parts, two you can control, the other less so.
Firstly, keeping your tension consistent is a key part of making stitching look neat, however, this will just come with repetition and muscle memory... so I wouldn't worry too much about this.
Secondly, the bit that is under your control is the amount of tension you put on each stitch. For neat stitches you're looking for a moderate tension. Too loose and the stitches won't sit straight and the thread will take up too much room in each hole. Too tight and it can distort the size and shape of each stitch and stretch the holes in the fabric. For me the perfect level of tension is that immediate moment I feel resistance as I'm pulling the thread through. As soon as I feel that resistance, I stop pulling.
Lastly, try to keep the tension on the stitch you just made while creating your next stitch. The way I do this is by using my finger at the back of the fabric to catch the thread and hold it aside with the slight tension on, while I'm making the next stitch with my other hand, as in this video...
2. start at the top corner and work down

I'm going against the grain a bit here...
The traditional advice is to start a cross stitch in the centre and work outwards, but personally I always find it so much neater to start in a top corner (or the 1st stitch of the top row) and work down, one row at a time (mostly). By doing this the holes that you are coming up through from the back (at the base of each stitch) are usually empty, so you wont split any threads and are unlikely to miss the hole (thereby splitting the fabric and creating a different shaped cross). And while the holes you go back down through may have thread in already, as you're stitching into them from the front you can see more clearly to avoid splitting threads or missing the hole.
3. consider your route
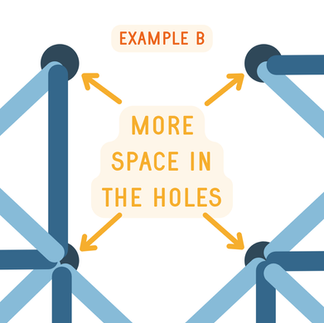
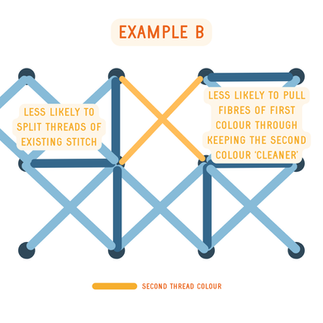
When planning your route through your pattern, try to consider which direction the thread on the back is going to pull the thread on the front, and how that might impact how much space you leave in a hole for future use. The aim is to keep each hole in the fabric 'open' despite having stitched through it. A more open hole has more space for you to put the needle through, reducing the chance of splitting the threads of existing stitches, and reducing the chance of pulling fibres through from an adjacent stitch colour which can 'muddy' the colour you're currently stitching with. I found this point really difficult to explain, so thought some diagrams might help.
Consider this pattern...

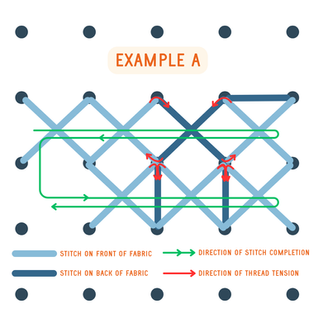
You could stitch it a few different ways, but for this purpose I'm going to give you two examples both using the Danish Method of stitching.
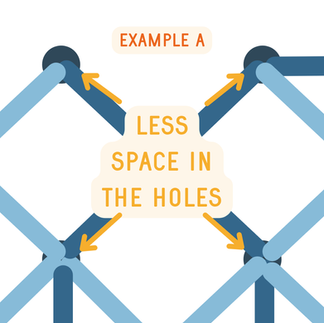
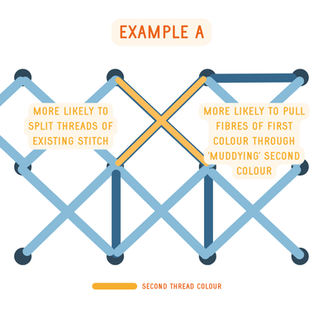
In Example A, you simply stitch all three blue stitches on the top row, carrying the thread behind where the yellow stitch will go, before moving onto the row below. However, as the thread is pulled across the back of the fabric, this effectively 'fills up' the holes, so when you try to complete the yellow stitch you're far more likely to split the existing blue threads and pull some blue fibres through into the yellow stitch. Click the below pictures to see what I mean.


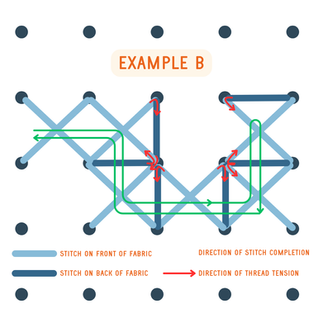
Alternatively, in Example B, you can see that if you stitched all the blue stitches around the gap where the yellow stitch will go, you leave far more space in the holes to use when stitching the yellow stitch, meaning no split threads and a cleaner yellow stitch.


Similarly, this technique helps when stitching patterns that aren't full coverage as any threads travelling across the back of unstitched fabric will show through. When I was stitching the Whitley Bay Sampler, part of the enjoyment for me was puzzling out my route to make sure I was avoiding crossing my thread over the back of blank areas. Also by planning your route you can be super efficient with thread! Another bonus!

4. Stitch lighter colours first
As mentioned in the previous point, when you stitch in an adjacent space to an existing stitch, it is common for you to pull fibres from the first colour through with the second colour. This can affect the colour of the stitch you are creating with that second colour, particularly if you are stitching a lighter stitch next to an existing darker stitch. If you stitch the lighter colours first, this is far less likely to be an issue as darker colours aren't affected by this as much. For example when I was Stitching our Edinburgh Castle design, I started with the sky, white and light pink and left the birds, text and dark brown trunks/branches until last.

The flip side to this is that you do then risk handling the lighter colours more, which can make them dirtier, so I would recommend washing your work once finished to clean away any oils from your hands or dirt from your hoop or anything else that might have been in contact with it.
5. Keep your top stitches all the same direction
This is a really easy and simple one to start doing. Cross stitches are all made up of a bottom leg, and a top leg. Due to the 3D nature of cross stitches, the bottom leg is generally in a bit of shadow so always looks very slightly darker, while the top leg gets more of the light so looks lighter. If your top legs are all in different directions, what should look like a smooth block of colour can look 'bitty' and can really distract the eye, so make sure all your top legs go in the same direction. In the diagram below you can see the difference.

Our patterns only use full stitches, but If your pattern calls for half stitches (aka stitches with only one leg), I would recommend using the same direction as the top stitches of your cross stitches.
6. be consistent with your direction of stitching

This is particularly important if you're stitching using the Danish method and if you're stitching block colours. Either stitch horizontally OR vertically across your pattern, but try to avoid mixing the direction up where possible. Because of the direction of the threads on the back of the fabric, and therefore the tension on the stitches on the front, it can impact the shape of each stitch, with horizontal stitches being very slightly shorter and wider, while vertically stitched stitches are slightly taller and narrower. You can see the side by side difference here...

7. pull your thread through each hole fully each time
For speed it's often tempting to only pull your thread fully through once you've brought your needle through two holes. This is also often a common practice when stitching in hand. However, due to the direction of pull in the thread compared to the fabric when doing this, you end up creating friction on the thread. Worst case scenario, the thread frays and splits completely. Best case scenario, the friction makes the thread increasingly fluffy towards the end, so you have some fluffy stitches than those stitched with the start of the thread. The lack of uniformity in stitches can make your work look more messy. Personally I try to pull each thread all the way through while held perpendicular to the fabric to minimise friction.
8. use threadgloss
On a similar note, another way to reduce friction on your thread and keep your stitches looking uniformly smooth is to use thread gloss. Thread gloss is a specially formulated conditioner that protects your threads and keeps them looking their best. Usually made from beeswax but there are some vegan thread gloss options out there. I absolutely love my thread gloss from Sew Luxe Co! It smells divine!
9. use the right tools and materials
This point has a few parts to it.
Firstly, using good quality materials is a must. Our kits all include DMC threads, Zweigart Aida and John James Needles (as seen in the pic below) because I know that all of these manufacturers are at the top of their game when it comes to creating high quality materials. Cheap, synthetic threads can look fluffy, cheap fabric can have a wonky weave creating stitches of varying sizes, and poor quality needles can fray your threads. You're putting so much effort into each piece, don't let the final piece suffer because of a few more pennies. The investment is totally worth it.

Secondly, using the right number of strands of thread for each stitch is important. Too many and it can look bulky and it can make it difficult to stitch into each hole, leading to lots of split threads and weird shaped stitches. Too few and your stitching can look 'gappy'. All our kits and patterns specify how many strands to use, but if you're creating something yourself, try stitching a few test swatches first to figure out how many strands are right for your project.
Thirdly, this might be a bit controversial, but ignore the 'cross stitch needle/fabric size' conversion charts. For a truly neat look you need to use the smallest needle that you can. A small needle will find the tiny gap that's left in the hole without splitting adjacent stitches, and it wont stretch the holes, creating a gappy look and stitches of inconsistent sizes. You just need to make sure that you can thread the amount of strands required and that the thread can move through the needles eye easily (to minimise friction). Personally I use size 26 needles for almost everything, and that's why I include this size needle in all our kits.
And lastly, if you need to, use a magnifier! There are some great options out there that really help you be more precise with where you're putting your needle.
10. Avoid twisted threads
This last point not only keeps your stitches looking super neat, but also has the added benefit of avoiding knots. I call that a win win! You can achieve it in a few ways...
Every few stitches, stop and let the needle and thread dangle and untwist itself.
Use the railroading method. This is where you put the needle between your working strands of thread before going back down through the fabric, encouraging the strands to lie parallel to each other.
If the pattern calls for multiple strands of thread, make sure you separate each individual strand from each other (so they aren't already twisted together) before bringing them back together. If the pattern calls for two strands, using a single strand doubled over with a loop start is another option.
Tips from the tribe!
Everyone is always learning, including me, so I asked the TSK tribe for their tips. Here's some of my favourites....
Carol -
"Don't think 'oo it'll be ok' if you notice a small misstitch or a bit of fluff/hair. Because once the project is finished it will be AAAALLLLL you can see! Better to suffer the pain of unpicking a few stitches now!"
Suzanne -
"Count and count again because you have to unpick and re-do"
Kelly -
"Don't eat chocolate hob nobs while stitching. You WILL get chocolate on your aida!"
On that note, also keep suncream far away from your work and your needle, it causes some awful stains, as I learnt recently!
I'd love to hear in the comments if these tips have been helpful and if there is anything you think I have missed!
J xx